How To: Installing WordPress for IIS7

So you fancy doing some blogging? How do you install WordPress for II7 and above? This should show you how to install WordPress in Internet Information Services 7.

First, fire up the Web Platform Installer as this is the easiest way to start. Choose the Applications tab and click “Add” next to WordPress:
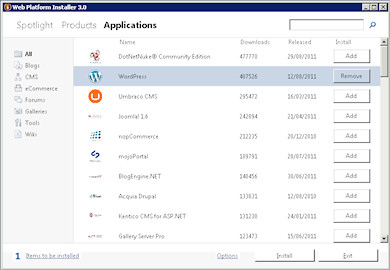
Choosing WordPress in the Web Platform Installer
Choose WordPress in the Web Platform Installer

The click “Install”. If you are asked whether to install any extra needed components (e.g. PHP, MySQL etc.) – confirm this.
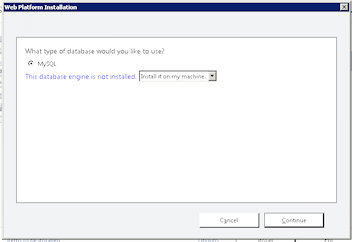
Choose to install MySQL locally

At the next screen choose to install MySQL locally; unless you are going to run it across multiple servers or have an install of MySQL you can use elsewhere.
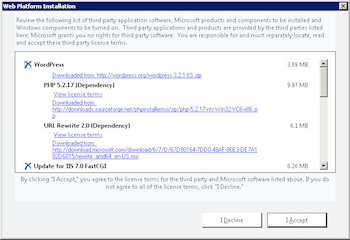
Confirm install, with required components (e.g. PHP)

Confirm the install at the next screen. The little crosses threw me a bit, ticks might have been better…
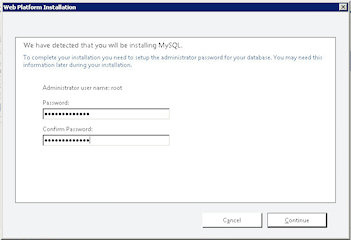
Choose admin password for MySQL

At the next screen you need to create an Admin password for MySQL. Remember what you enter as this password as you will need it later – click continue.
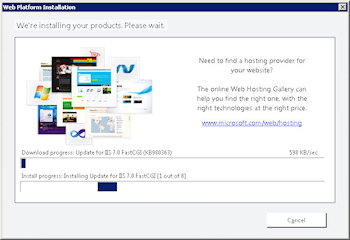
Wait for install to complete

The install of all the various components, and any service packs etc. can take a little while so be patient…

You may have to restart a couple times

You may be asked to restart a couple times, depending on what bits needed to be installed. After a reboot, if the installation doesn’t continue straight away – just fire up the Web Platform Installer again and it will continue.
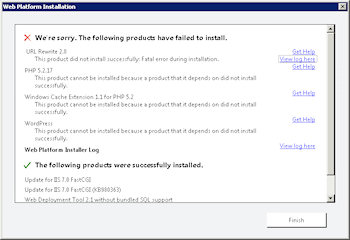
You may receive installation errors

If you receive any installation errors; check the logs, however this is likely to be from restarting at inappropriate times. Just reselect WordPress to install – your list of extra extensions should be shorter – and hopefully the install will now complete without errors.

Choose IIS website setup details (click for larger)

At the next screen you choose how your new WordPress site will be accessed from the internet (click to see larger version):

  • Website: Either Choose a “New Website” if you want it to go from the root of a domain or subdomain; or choose an existing site if you want it off a subdriectory.
  • ‘WordPress’ application name: Use / if you are creating a new website and want it in the root, else choose the subdirectory you want it accessed from the Internet at.
  • Web Site Name: This is the both the Application pool and the name of the Site in IIS Manager, unless you are creating a subdirectory – when it is just the name of the App Pool.
  • Physical path: This is the actual physical directory on disk where your WordPress files will be held.
  • IP Address: Unless you want WordPress to only respond on a particular IP address – just leave this as “All Unassigned”
  • Host Name: This is the actual domain that WordPress will respond to, so set it to the subdomain or domain you want to use e.g. blog.yoursite.com or www.myblog.com etc.

After filling in the details you want to use, click continue.

Enter the database login credentials you provided earlier (click for larger)

At the next screen you need to use the database password you entered earlier for the Database Administrator Password. Scrolling further down:

Enter details for a new user WordPress will use (click for larger)

Choose a database User Name and password for the install to create. Note: this is not the user name you will be using, but the user WordPress will use to connect to the database. If you installed the database locally, put localhost in for the Database Server.

Scrolling further down:

Add some strengthening phrases (click for larger)

Enter a database name to use, this could be the name of the blog or the website name you used earlier. Next you need to enter a set of Unique Key phrases. These are to strengthen the encryption for passwords and authentication. Go wild, you don’t need to remember these.

Click continue:

Installation complete, click launch WordPress

You’ve now installed WordPress and just need to do a final configuration step, so click the “Launch WordPress” link on this page.

Configure WordPress and setup new user (click for larger)

Now you just need to fill in a few more details on you new WordPress website.

  • Site Title: This is the title of you blog “My blog” or whatever you want it to be known as.
  • Username: This is the Username you will use to actually login to your WordPress site.
  • Password: Choose a password
  • Your E-mail: And enter your email address

Click install WordPress…

Congratulations! You should now how WordPress successfully installed and ready to use. Just log in at the next screen providing the login credentials you just supplied:

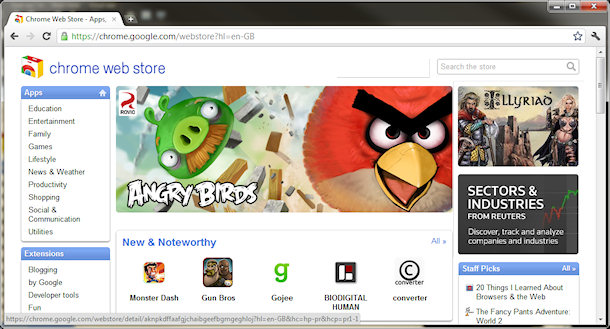
Chrome Web Store

When you’re a small indie game developer and you’ve just released your very first game, “getting the word out” is just about the most important thing left to do.

It’s also typically the biggest budget expense item via the traditional method of online advertising.

You can have all the upgrades and expansion packs in the pipeline that you like, but if no one is playing the game – or if the cost per acquisition of new players via advertising is astronomical and ever increasing due to the number of competitors vying for the same keywords – then you’re in no small amount of trouble.

Sometimes, however, you get lucky (or make your own luck!) – and an influential big brother steps onto the scene to champion your efforts.  We’ve been very lucky with massively.com’s coverage of Illyriad, and now we have our second champion!

Largely, we think, thanks to our move to an HTML5 Canvas environment on the World Map, Illyriad came to the attention of those mighty, mighty fine people at the Google Chrome Web Store (CWS) at the end of last week; and they’ve been helping to promote Illyriad since.

The first we knew about our presence on the CWS homepage was when the ‘new player has joined’ “bing” noise (yes, I have a desktop dashboard that goes “bing”… I know, I know. Don’t say anything) changed from a “bing” into a continuous drone.

Not only are CWS promoting us on the homepage, but we’re also in the rotation for the Games and Entertainment categories.

Since we’ve been this visible on the CWS platform, new player acquisitions have increased 412%.  No, that’s not a typo. That’s four hundred and twelve percent.

As if that wasn’t enough, the icing on the proverbial cake is that the Chrome browser itself runs HTML5 and the Canvas technology very fast and very smoothly (in our opinion, Chrome is far-and-away the best browser out there for developing and rendering HTML5 technologies).   Whilst we do, and will, continue to support earlier, non-HTML5 browser versions of all the major browsers, it’s been fantastic knowing that the huge new influx of users coming to Illyriad from the CWS are getting the best possible HTML5 experience once they log in.

Since we  integrated OpenID over the last weekend, CWS users are also getting a streamlined one-click login experience using their Google credentials.  Now we’re moving onto Google pay integration, and can’t wait to see what the Google plus platform can do for us in the future.

In short: if you write any kind of app then getting it onto the Google Chrome Web Store is an absolute “must-do” when it comes to promoting your game, and (especially compared to some of the other app platforms) it’s remarkably easy to do.

As you can imagine, we’re over the moon about this!

Integration: Chrome Web Store

Publishing your web app on the Chrome Web Store is so straight forward, not doing so almost seems foolish!

Create a zip file containing a folder “chrome_app” and inside that two files:

  1. 128×128 png icon file
  2. manifest.json file
The manifest we use for Illyriad looks similar to this (make sure the icon field matches the name and case of the icon in the zip):

[code lang=”javascript” title=”manifest.json”]
{
"name": "Illyriad Test",
"description": "Real-time massively-multiplayer…",
"version": "1.0",
"app": {
"urls": [
"https://www.illyriad.co.uk/",
"https://uk1.illyriad.co.uk/",
"https://img3.illyriad.co.uk/",
"https://img4.illyriad.co.uk/",
"https://img5.illyriad.co.uk/",
"https://img6.illyriad.co.uk/"
],
"launch": {
"web_url": "https://www.illyriad.co.uk/loginOAuth.asp"
}
},
"icons": {
"128": "Logo-128.png"
},
"permissions": [
"unlimitedStorage",
"notifications"
]
}
[/code]

Your launch web_url should be either your login page, or if not required the main app page. If you do require a login page it’s also advisable to accept Google OpenId, at which point you can bypass the login page for CWS users who have a Google account and have approved you; but more on this in a later post.

To publish your app and access the developer dashboard a one-off developer registration fee of US$5.00 is required to verify your account, and presumably to cut down on spammers.

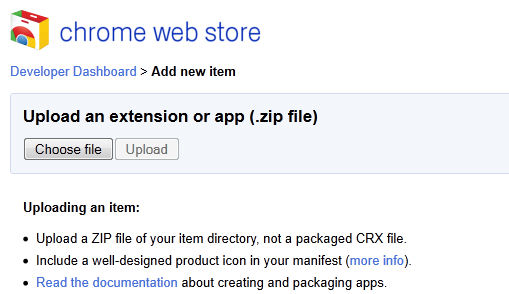
In the CWS developer dashboard click the Add new item button, which will take you to the upload app page:

Choose the zip file you created earlier and upload it:

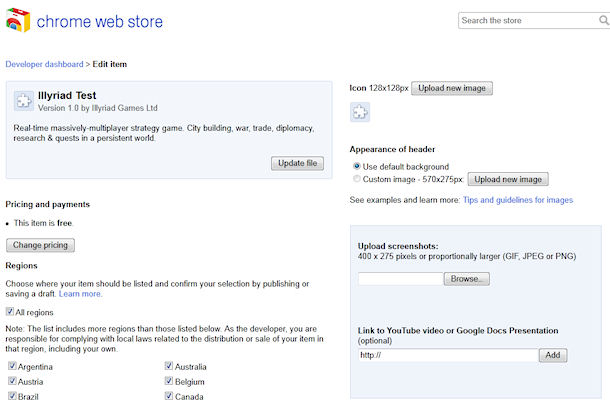
Once you have uploaded your zip you will be taken to the Edit item page. First thing to do is upload the Icon you used in the zip file (unless you want a different icon in the Web Store to the one to be displayed in Chrome)

Now you’ll want to marketing materials. You can choose at the bottom of the page “Save draft and return to dashboard” if you don’t have these ready yet, so you can return to editing later. The items you’ll want are:

  1. A detailed description (Focus on explaining what the item does and why users should install it)
  2. Some screenshots (400 x 275 pixels or proportionally larger)
  3. (Optional) A YouTube video
  4. (Optional) A background image to show on your app page
  5. (Optional) 2 promotional images

After adding these on the edit item page, choose a category to publish in and then click “Preview changes” to see what your item will look like. If you like it hit publish, else return to editing. At this point you are published! Easy!

There is lots more you can do, of course, you can publish to test users first, use a verified website,  change your pricing – your apps don’t have to be free, you can change the pricing and also sell apps from the Web Store – it is a store after all! But this should get you on your way…