Releasing code in a live environment

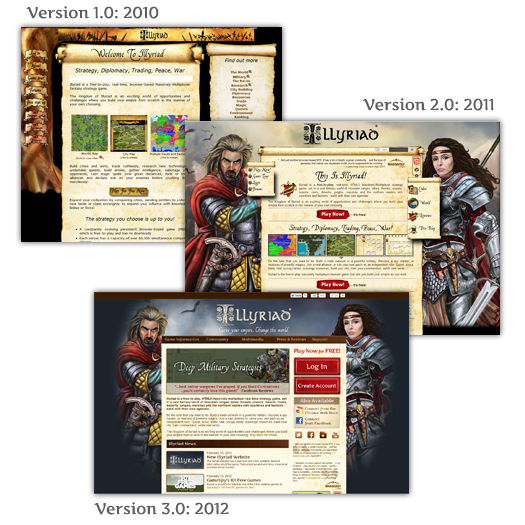
Running a massively multiplayer game is difficult. You need good up-time, but also need to continuously update the game and add new content. The server is busy. We’ve had over 900 million page views in our three years since launch and we currently average 800 page views a minute with over 1.2 million a day – and that’s only active pages being viewed; not including game notifications, passive chat, or any ingame popups. We’ve just done our 815th releaseto live; I imagine even our players don’t know we release something on average every 1.4 days. Some are minor bug fixes, others full UI refreshes, of which we have done 3:

We are available on many platforms, with an HTML5 website game, a Chrome Webstore App, Firefox App, a Facebook game, and Windows 8 App; all of which run on the same single sharded world, and all of which need to be kept up to date and in sync. We have to ensure with each change everything keeps working on all the different platforms, different browsers and different devices – Illyriad even works on a Kindle Touch! We run a full Microsoft stack, have changed CDN 4 times, and during these three years we’ve had 1 day of cumulative downtime, mostly for security patches, although our longest period was for completely moving hosting providers to Hivelocity for our dedicated servers and Windows Azure for our cloud based needs and CDN – lots of live data to move. All through this the players keep playing. Blissfully unaware of all the changes going on. Sending their troops on 58 million combat missions, their traders on 41 million missions and building their 33 million buildings, all the while chatting 213 million words together. Each update is transparent and doesn’t interrupt the players’ play time for patching. People live busy lives, and they have chosen to give their precious time to play the game and that must be respected. They don’t want to spend that time waiting for downloads, patching and updates. They just want to play. Maintaining a uninterrupted service, with huge concurrency and transparent updates is hard, but its worth it!

Illyriad at Night

Winter has come. The days have grown short and the nights long.

High above the lands, the atmosphere is almost serene. The wars and daily conflict seem far away; but even here the busy activity and effects of players can be clearly seen!

At night the lights of the settlements and sovereignty glow bright:

Illyriad at Night
Illyriad at Night (click to zoom)

Flying into central Elgea you can see the ring of settlements formed by new players:

Central Elgea (New Player Ring)
Central Elgea - New Player Ring (click to zoom)

Looking to the south-west, the outline of the ocean is visible as well as the smaller settled islands. Also some almost constellation-like joined up lights can be picked out:

South-West Elgea
South-West Elgea (click to zoom)

Turning up the contrast and zooming in shows some interesting player land claims. All over the map an Alliance is claiming road like structures:

Road building?
Road building?

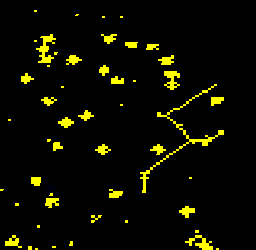
While another owns land in a shape that resembles a person with a hat and a cape?

Man with Silly Hat?
Person with a hat and a cape?

Reviewing the bill of land ownership lodged at King Sigurd’s Council Of Illyria; indeed this land is claimed by the alliances: Fairy Road Authority and Silly Hats respectively. Creative expansion plans!

Academic Aside: An interesting analysis, when just considering player towns (excluding sovereignty), their arrangement resembles a Poisson disk sample. 99% of these towns outside the “new player ring” are consciously placed by thousands of individual players acting independently.

WebGL Experiments: Texture Compression

Lilli Thompson from Google asked us how we were doing texture decompression in the pixel shaders and what algorithm we were using. We thought we would share our answer…

Texture compression was a bit of journey – as no one at Illyriad had ever implemented anything in 3d before; to us texture compression was mostly a tick box on a graphics card.

It started when we found out our 90MB of jpegs expanded to 2GB of on-board memory and we were worried we’d made a terrible mistake, as this was certainly beyond the possibilities of low-end hardware! Half of it this was due to Three.js keeping a reference to the image and the image also being copied to the GPU process – so essentially the required texture memory doubled.

Dropping the reference Three.js held after the texture was bound to WebGL resolved this. I’m not sure how this will play out with context lost events – as I assume we will have lost the texture at that point – but local caching in the file system and reloading may help with recreating them at speed.

With 1GB of memory remaining we were faced with three choices – either deciding what were were trying to do wasn’t possible; reducing the texture sizes and losing fidelity or trying to implement texture de-compression in the shader. Naturally we opted for the last.

We were originally planning to use 24bit S3TC/DX1; however this proved overly complex in the time we had available as the pixel shaders have no integer masking or bitshifts and everything needs to be worked in floats. The wonders we could unleash with binary operators and type casting (not conversion) – but I digress…

In the end we compromised on 256 colour pallettized textures (using AMD’s The Compressonator to generate P8 .DDS textures). This reduced the texture to one byte per pixel – not as small or high colour as DX1 – but already 4 times smaller than our original uncompressed RGBA textures.

It took a while to divine the file format; which we load via XMLHttpRequest into an arraybuffer. The files have 128 bytes of header which we ignore, followed by the 256×4 byte palette which we load into a lookup table texture RGBA. The rest we load into a Luminance texture. Both textures need to use NearestFilter sampling and not use mipmapping to be interpreted sensibly.

We have created our own compressed texture loaders – the colour texture loader looks a little like this:

[code lang=”javascript”]
Illyriad.TextureCompColorLoader = function (path, width, height, uniforms) {
var texture = new THREE.DataTexture(0, 1, 1, THREE.LuminanceFormat,
(new THREE.UVMapping()), THREE.RepeatWrapping, THREE.RepeatWrapping,
THREE.NearestFilter, THREE.NearestFilter);

var request = new XMLHttpRequest();
request.open("GET", path, true);
request.responseType = "arraybuffer";

// Decode asynchronously
request.onload = function () {
if (request.status == 200) {
var imageDataLength = request.response.byteLength – width * height;
uniforms.tColorLUT.texture = new THREE.DataTexture(
new Uint8Array(request.response, 128, 256 * 4),
256, 1, THREE.RGBAFormat, (new THREE.UVMapping()),
THREE.ClampToEdgeWrapping, THREE.ClampToEdgeWrapping,
THREE.NearestFilter, THREE.NearestFilter);
uniforms.tColorLUT.texture.needsUpdate = true;
texture.image = { data: new Uint8Array(request.response, imageDataLength),
width: width, height: height };
texture.needsUpdate = true;
}
}
request.send();
return texture;
}
[/code]

When we first did the decompression in the pixel shader, it was very blocky as we had turned off filtering to read the correct values from the texture. To get around this we had to add our own bilinearSample function to do the blending for us. In this function it uses the diffuse texture with the colour look up table and using the texture size and texture pixel interval samples the surrounding pixels. The other gotcha is that the lookup texture is in BGRA format so the colours need to be swizzeled. This makes that portion of the shader look like this:

[code]
uniform sampler2D tDiffuse;
uniform sampler2D tColorLUT;

uniform float uTextInterval;
uniform float uTextSize;

vec3 bilinearSample(vec2 uv, sampler2D indexT, sampler2D LUT)
{
vec2 tlLUT = texture2D(indexT, uv ).xx;
vec2 trLUT = texture2D(indexT, uv + vec2(uTextInterval, 0)).xx ;
vec2 blLUT = texture2D(indexT, uv + vec2(0, uTextInterval)).xx;
vec2 brLUT = texture2D(indexT, uv + vec2(uTextInterval , uTextInterval)).xx;

vec2 f = fract( uv.xy * uTextSize );
vec4 tl = texture2D(LUT, tlLUT).zyxw;
vec4 tr = texture2D(LUT, trLUT).zyxw;
vec4 bl = texture2D(LUT, blLUT).zyxw;
vec4 br = texture2D(LUT, brLUT).zyxw;
vec4 tA = mix( tl, tr, f.x );
vec4 tB = mix( bl, br, f.x );
return mix( tA, tB, f.y ).xyz;
}

void main()
{
vec4 colour = vec4(bilinearSample(vUv,tDiffuse,tColorLUT),1.0);

[/code]

This performs fairly well; and certainly better than when your computer feels some virtual memory is required because you are using too much! However, I’m sure on-board graphics card decompression should be swifter and hopefully open up the more complex S3TC/DX1-5 compression formats.

There is a major downside however with decompressing this way in the pixel shader. You have to turn off mipmapping! Not only does turning off mipmapping cause a performance hit as you always have to read the full-size textures – but more importantly it doesn’t look good. In fact in the demo – we had to use full-size textures for the grass so we could apply mipmapping as otherwise in the distance it was a wall of static!

Unfortunately, as far as I’m aware, WebGL while you can create mipmaps with generateMipmap – you can’t supply your own. Again, real compressed textures should help here.

EDIT: Benoit Jacob has pointed out this is possible by passing a non-zero ‘level’ parameter to texImage2D – one to look into.

Some caveats on the demo:

  • Obviously even 90MB of jpeg textures is far too much – the production version will be substantially smaller, as we are being a bit smarter on how we will be using them.
  • This has been a learning process both for us and Quantic Arts (who are used to boxed set games).
  • This was a tester to see the upper limits of what we can do in WebGL, so we haven’t been focusing on optimization yet.
  • We will be reworking the obj models to reduce their download size substantially.
  • The way the game works is that no one player will need all the textures at once (the time between queuing a building and it’s actual appearance in the game allows us to download the models/texture)

So the actual game requirements will be much much lower.
WebGL Experiments: Illyriad’s 3d Town

What can WebGL do? Can it do what we want? We were wondering.. and so decided to put it to the test…

To test the upper bounds of WebGL we put together a rough and ready demo [caution – it’s bandwidth hungry].  It’s very rough, not optimized and currently only runs on Chrome [working in all browsers that support WebGL is our priority]; but that’s kind of the point – its a technology tester to ensure we weren’t making a mistake.

The results speak of themselves – it definitely proves itself!  Sure it needs a bit more polish, but we are now confident that the actual in-game libraries we are building have a lot of head room to use. Below are a couple screenshots of the town during the day:


And another at night:

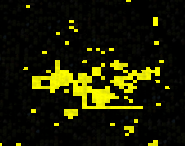
Of course there were many trials along the way and things that didn’t quite work as we’d planned as can seen below:


We learnt the importance of GPU compressed textures and had to write a pixel shader decompressor of our own, as WebGL doesn’t currently support them natively – but with a cost.  The loss of mip-maping this causes it can clearly be seen; and we will have to work around this if they are not supported soon.

Overall we are very pleased with the result, which you can check out here.  Remember to press space to unlock your mouse to look around – if you aren’t fond of reading on-screen instructions 😉

Naturally this is just a taster of what we have waiting in the wings. We’ll look to provide some follow-up blog posts about the techniques and tools being used in this early experiment including:

  • Web Audio API
  • Pixel shader texture decompression
  • Deferred shading

3rd Party Libraries in use

Illyriad: HTML5 WebGL Preview 2

We thought we’d up the game on the last demo and show a bit of lighting and animation.

A high level flour mill from Illyriad seemed an obvious choice!

Again this is purely HTML5 using the WebGL canvas and JavaScript; no plugins were used. We use mrdoob’s excellent Three.js library:

[youtube=https://www.youtube.com/watch?v=0bZmt3yQzmE]

We’ve included the full browser window in this recording to show that it is in fact running in a Chrome browser window. While it happily runs at 1080p, we’ve had to record at a much lower resolution as the screen capture utility slows everything down… Alas.

Illyriad: HTML5 WebGL Preview

We’ve done a bit of bloging about the “now”, but what about the future?

Well here at Illyriad we’ve been experimenting with WebGL and I can tell you we are impressed with how its shaping up.

Here’s a little taster of what we’ve been trying:

[youtube=https://www.youtube.com/watch?v=F22IvhUtrmM]

Its slightly shaky – but that’s my mouse movement not any lag from WebGL. Looks like I might never be a brain surgeon… haha

HTML5 Canvas: Creating a screenshot from multiple canvases in JavaScript

Programmatically creating screenshots from JavaScript of your canvas element is fairly straightforward; but how do you do it when your game or scene is composed of multiple overlaid canvases?

This example makes use of the canvas caching and it links into the animation loop for starting and stopping – your mileage may vary.

For simplicity, lets say we have 4 canvas elements in use, all of the same size (500×500) used in the following order:

  1. A far background: canvasFar
  2. A near background for a touch of Parallax scrolling: canvasNear
  3. A layer for player characters and other objects: canvasSprites
  4. A layer for special effects: canvasEffects

[code lang=”javascript”]
function TakeScreenshot() {
StopAnimating(); // Stop the animation loop

var bufferScreenshot = CreateCanvasCached("Screenshot");
bufferScreenshot.height = 500; bufferScreenshot.width = 500;
var contextScreenshot = bufferScreenshot.getContext("2d");
// Draw the layers in order
contextScreenshot.drawImage(
document.getElementById("canvasFar"), 0, 0, 500, 500);
contextScreenshot.drawImage(
document.getElementById("canvasNear"), 0, 0, 500, 500);
contextScreenshot.drawImage(
document.getElementById("canvasSprites"), 0, 0, 500, 500);
contextScreenshot.drawImage(
document.getElementById("canvasEffects"), 0, 0, 500, 500);

// Save to a data URL as a jpeg quality 9
var imgUrl = bufferScreenshot.toDataURL("image/jpeg", .9);

StartAnimating(); // Restart the animation loop
return imgUrl;
}
[/code]

Now calling TakeScreenshot() will return a data URL that contains the image – with this you can:

  • Set the src of an image element or css background
  • Open it in a new window to display it as an image (unfortunately you can’t set the content-disposition or filename of a data URL for automatic download)
  • Send it to your sever to base64 decode and create an image file which you can then to popup a download or embed in a page which can then be shared, tweeted, posted to Google+ or Facebook.
  • Use it as source image for more canvas fun or a WebGl texture

UPDATE: There is a toBlob() method on Canvas that allows the saving of generated files on the client-side which is coming in Chrome 14, hopefully other browsers will follow suit.

This should all work fine.  However if you are using images from different domains or a multiple sub-domains – either by using a CDN or for paralleling requests across domain names you will receive a:

SECURITY_ERR: DOM Exception 18

This is a security protection to ensure your code isn’t grabbing images it shouldn’t be, and sending them back to your server. I’ll post about how to work with this in a future post.

(Fix) Memory Leaks: Animating HTML5 Canvas

If you create canvas elements dynamically either for off-screen composition or sprite manipulation, when this is in an animation loop running hundreds of times a second it can start to leak memory.

I’m not entirely sure why this is; but it’s quite widespread in many browsers including Webkit. Perhaps the animation causes the browser to register as continually active which prevents the garbage collector from running – as it will clean it up if you stop the animation and change DOM elements e.g. from an Ajax update. But that’s just wild speculation…

What we are interested in is how to fix it, and also achieve some performance gains from not continuously creating DOM elements.

The trick is to create a function which caches these canvas elements and reuses them. The easiest way is to have a create canvas function that handles all this for you. To keep a handle on the different canvases in use in Illyriad, we use a named canvas element to ensure the correct one is returned. You can call them whatever is relevant:

[code lang=”javascript” title=”Create cached canvas”]
var CachedCanvases = new Object(); // Canvas element cache

function CreateCanvasCached(name) {
if (!CachedCanvases[name]) {
var canvas = document.createElement(‘canvas’);
CachedCanvases[name] = canvas;
return canvas;
}
return CachedCanvases[name];
};
[/code]

Using this is very simple, whenever you create a canvas dynamically that is just used for composition just (i.e. you won’t attach it to the DOM) use the cache function:

[code lang=”javascript”]
var SpriteCompositionCanvas = CreateCanvasCached("sprite");
SpriteCompositionCanvas.width = 64; SpriteCompositionCanvas.height = 64;
var SpriteCompositionContext = SpriteCompositionCanvas.getContext("2d");

[/code]

I’ll do another post on some of the wonderful composition operations you can do using canvas; when this technique will become very important.

If you are updating your page using Ajax and programmatically adding and removing the display of canvas elements you will want to clear the canvas cache when you change page by adding a cache clean up to your ajax page unload function.

[code lang=”javascript”]
function CleanupCachedCanvasses() {
var delList = new Array();
for (name in CachedCanvases) {
delList.push(name);
}
for (i = 0; i < delList.length; i++) {
delete CachedCanvases[delList[i]];
}
delete delList;
}
[/code]

Now you should be good to go!

HTML5 Canvas: Animation Loop – Only work when you have to

Animating HTML5 Canvas be it 2d or WebGl can put a strain on the end user’s browser.

Trying to draw more animation frames than the browser can handle can lock it up or cause it to terminate your script. Also if the user is viewing a different tab or is in another window; burning the user’s CPU on animation they don’t even see is just squandering their resources.

Luckily, much like debouncing and throttling for user input and ajax calls, there is something we can do. HTML5 provides a neat solution for animation.  The requestAnimationFrame function allows you to put in a call-back which gets executed when the browser is ready to draw another frame. This allows the browser to throttle the animation based on the current CPU load and whether the canvas is on screen or not, resulting in a far better performance and a much lower resource usage.

However, some older browsers don’t support requestAnimationFrame, but we can use the following code to detect if they do, and if they don’t, run though some earlier implementations and finally a fall-back method to ensure we can still use the function:

[code lang=”javascript” title=”Setting up timing function”]
if (!window.requestAnimationFrame) {
window.requestAnimationFrame = (function () {
return window.webkitRequestAnimationFrame ||
window.mozRequestAnimationFrame ||
window.oRequestAnimationFrame ||
window.msRequestAnimationFrame ||
function ( callback,element) {
window.setTimeout(callback, 1000 / 60); // Fallback timeout
};
})();
}
[/code]

To use this function we need to create an animation loop. Also if we separate our animated elements from our static elements (e.g. background) into different canvases, we only need to redraw the static elements when they change which is far less frequently.

For this we create two functions renderStatic and renderAnim; which are outside the scope of this article, but there are plenty of canvas examples to draw on. When the static elements require redrawing we just set the requiresRedraw variable to true.

Putting this altogether we end up with a animation loop looking similar to the following:

[code lang=”javascript” title=”Setting up animation callback”]
var isAnimating = false; // Is animation on or off?
var animateRunning = false; // Are we in the animation loop?
var requiresRedraw = true; // Do the static elements need to be redrawn?

function StartAnimating() { // Start animating/drawing
isAnimating = true;
if (!animateRunning) Draw(); // Only draw if we are not already drawing
}
function StopAnimating() { // Stop animating/drawing
isAnimating = false;
}

function Draw() {
if (isAnimating) { // Only draw if we are drawing
animateRunning = true;
try {
if (requiresRedraw) {
requiresRedraw = false;
renderStatic(); // function defined elsewhere
// which draws static elements
}
renderAnim(); // function defined elsewhere
// which draws animated elements
} catch (e) {
if (window.console && window.console.log)
window.console.log(e); // for debugging
}
requestAnimationFrame(Draw);
animateRunning = false;
}
}
[/code]

To start the drawing we can use StartAnimating() and to stop we can use StopAnimating()

Following this pattern should help you improve the performance of your HTML5 canvas app – while also reducing the load on your user’s computer. A double benefit!