Free for All: News roundup from some of my favorite free-to-plays

Illyriad was mentioned in Massively’s Free for All column:

“One of my favorite games, browser-based or not, has been maintaining a pretty cool new blog for a while now. It’s good to see Illyriad being treated as seriously as it is by the developer. The official blog Beneath the Misted Land lets players look behind the scenes into the nitty-gritty world of coding and development, something I would love to see more developers do.”

You can read the full article here.

Illyriad: HTML5 WebGL Preview

We’ve done a bit of bloging about the “now”, but what about the future?

Well here at Illyriad we’ve been experimenting with WebGL and I can tell you we are impressed with how its shaping up.

Here’s a little taster of what we’ve been trying:

[youtube=https://www.youtube.com/watch?v=F22IvhUtrmM]

Its slightly shaky – but that’s my mouse movement not any lag from WebGL. Looks like I might never be a brain surgeon… haha

HTML5 Canvas: Creating a screenshot from multiple canvases in JavaScript

Programmatically creating screenshots from JavaScript of your canvas element is fairly straightforward; but how do you do it when your game or scene is composed of multiple overlaid canvases?

This example makes use of the canvas caching and it links into the animation loop for starting and stopping – your mileage may vary.

For simplicity, lets say we have 4 canvas elements in use, all of the same size (500×500) used in the following order:

  1. A far background: canvasFar
  2. A near background for a touch of Parallax scrolling: canvasNear
  3. A layer for player characters and other objects: canvasSprites
  4. A layer for special effects: canvasEffects

[code lang=”javascript”]
function TakeScreenshot() {
StopAnimating(); // Stop the animation loop

var bufferScreenshot = CreateCanvasCached("Screenshot");
bufferScreenshot.height = 500; bufferScreenshot.width = 500;
var contextScreenshot = bufferScreenshot.getContext("2d");
// Draw the layers in order
contextScreenshot.drawImage(
document.getElementById("canvasFar"), 0, 0, 500, 500);
contextScreenshot.drawImage(
document.getElementById("canvasNear"), 0, 0, 500, 500);
contextScreenshot.drawImage(
document.getElementById("canvasSprites"), 0, 0, 500, 500);
contextScreenshot.drawImage(
document.getElementById("canvasEffects"), 0, 0, 500, 500);

// Save to a data URL as a jpeg quality 9
var imgUrl = bufferScreenshot.toDataURL("image/jpeg", .9);

StartAnimating(); // Restart the animation loop
return imgUrl;
}
[/code]

Now calling TakeScreenshot() will return a data URL that contains the image – with this you can:

  • Set the src of an image element or css background
  • Open it in a new window to display it as an image (unfortunately you can’t set the content-disposition or filename of a data URL for automatic download)
  • Send it to your sever to base64 decode and create an image file which you can then to popup a download or embed in a page which can then be shared, tweeted, posted to Google+ or Facebook.
  • Use it as source image for more canvas fun or a WebGl texture

UPDATE: There is a toBlob() method on Canvas that allows the saving of generated files on the client-side which is coming in Chrome 14, hopefully other browsers will follow suit.

This should all work fine.  However if you are using images from different domains or a multiple sub-domains – either by using a CDN or for paralleling requests across domain names you will receive a:

SECURITY_ERR: DOM Exception 18

This is a security protection to ensure your code isn’t grabbing images it shouldn’t be, and sending them back to your server. I’ll post about how to work with this in a future post.

(Fix) Memory Leaks: Animating HTML5 Canvas

If you create canvas elements dynamically either for off-screen composition or sprite manipulation, when this is in an animation loop running hundreds of times a second it can start to leak memory.

I’m not entirely sure why this is; but it’s quite widespread in many browsers including Webkit. Perhaps the animation causes the browser to register as continually active which prevents the garbage collector from running – as it will clean it up if you stop the animation and change DOM elements e.g. from an Ajax update. But that’s just wild speculation…

What we are interested in is how to fix it, and also achieve some performance gains from not continuously creating DOM elements.

The trick is to create a function which caches these canvas elements and reuses them. The easiest way is to have a create canvas function that handles all this for you. To keep a handle on the different canvases in use in Illyriad, we use a named canvas element to ensure the correct one is returned. You can call them whatever is relevant:

[code lang=”javascript” title=”Create cached canvas”]
var CachedCanvases = new Object(); // Canvas element cache

function CreateCanvasCached(name) {
if (!CachedCanvases[name]) {
var canvas = document.createElement(‘canvas’);
CachedCanvases[name] = canvas;
return canvas;
}
return CachedCanvases[name];
};
[/code]

Using this is very simple, whenever you create a canvas dynamically that is just used for composition just (i.e. you won’t attach it to the DOM) use the cache function:

[code lang=”javascript”]
var SpriteCompositionCanvas = CreateCanvasCached("sprite");
SpriteCompositionCanvas.width = 64; SpriteCompositionCanvas.height = 64;
var SpriteCompositionContext = SpriteCompositionCanvas.getContext("2d");

[/code]

I’ll do another post on some of the wonderful composition operations you can do using canvas; when this technique will become very important.

If you are updating your page using Ajax and programmatically adding and removing the display of canvas elements you will want to clear the canvas cache when you change page by adding a cache clean up to your ajax page unload function.

[code lang=”javascript”]
function CleanupCachedCanvasses() {
var delList = new Array();
for (name in CachedCanvases) {
delList.push(name);
}
for (i = 0; i < delList.length; i++) {
delete CachedCanvases[delList[i]];
}
delete delList;
}
[/code]

Now you should be good to go!

Better Than It Needs To Be

The strength of Illyriad’s character art is that it isn’t as good as it needs to be. It’s deliberately much better than it needs to be.

It’s the Abba theory. Abba, the theory goes, may be at heart mere Pop music, but it has stood the test of time and is still well loved, because it is much better than it needs to be. Abba may be inconsequential Pop, but it’s so wonderfully crafted that decades later the songs can still delight.

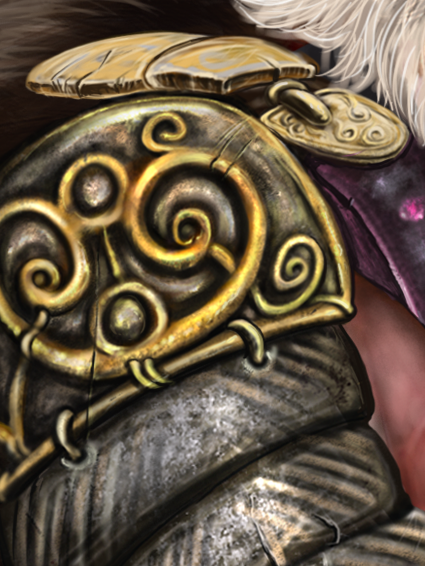
The character art for Illyriad has been broadly praised, and many of the individual portraits have a quality that brings a smile to the face. The key to this, I think, is that we didn’t set out to make the characters good enough, appropriate, acceptable. We set out to make them brilliant, and then poured love into them. It’s easy to say, but hard to do – and requires a much greater focus on the details. Look, for example, at this close-up of our male Dwarf – at his pauldron and the buckle on his breast-plate:

No-one ever needs to see the character this close up. Players will see this piece of armor at between 10% and 30% of this size. We never said to ourselves “do we need to show scratches and chips on his armor? do we need that much subtlety in the texture on the metal?” We just put the detail in without questioning it, because we were determined to make the portrait brilliant. But having lavished love on each inch of a character, the overall effect, when you stand back and look at him or her from a distance, is that the quality shines through.

HTML5 Canvas: Animation Loop – Only work when you have to

Animating HTML5 Canvas be it 2d or WebGl can put a strain on the end user’s browser.

Trying to draw more animation frames than the browser can handle can lock it up or cause it to terminate your script. Also if the user is viewing a different tab or is in another window; burning the user’s CPU on animation they don’t even see is just squandering their resources.

Luckily, much like debouncing and throttling for user input and ajax calls, there is something we can do. HTML5 provides a neat solution for animation.  The requestAnimationFrame function allows you to put in a call-back which gets executed when the browser is ready to draw another frame. This allows the browser to throttle the animation based on the current CPU load and whether the canvas is on screen or not, resulting in a far better performance and a much lower resource usage.

However, some older browsers don’t support requestAnimationFrame, but we can use the following code to detect if they do, and if they don’t, run though some earlier implementations and finally a fall-back method to ensure we can still use the function:

[code lang=”javascript” title=”Setting up timing function”]
if (!window.requestAnimationFrame) {
window.requestAnimationFrame = (function () {
return window.webkitRequestAnimationFrame ||
window.mozRequestAnimationFrame ||
window.oRequestAnimationFrame ||
window.msRequestAnimationFrame ||
function ( callback,element) {
window.setTimeout(callback, 1000 / 60); // Fallback timeout
};
})();
}
[/code]

To use this function we need to create an animation loop. Also if we separate our animated elements from our static elements (e.g. background) into different canvases, we only need to redraw the static elements when they change which is far less frequently.

For this we create two functions renderStatic and renderAnim; which are outside the scope of this article, but there are plenty of canvas examples to draw on. When the static elements require redrawing we just set the requiresRedraw variable to true.

Putting this altogether we end up with a animation loop looking similar to the following:

[code lang=”javascript” title=”Setting up animation callback”]
var isAnimating = false; // Is animation on or off?
var animateRunning = false; // Are we in the animation loop?
var requiresRedraw = true; // Do the static elements need to be redrawn?

function StartAnimating() { // Start animating/drawing
isAnimating = true;
if (!animateRunning) Draw(); // Only draw if we are not already drawing
}
function StopAnimating() { // Stop animating/drawing
isAnimating = false;
}

function Draw() {
if (isAnimating) { // Only draw if we are drawing
animateRunning = true;
try {
if (requiresRedraw) {
requiresRedraw = false;
renderStatic(); // function defined elsewhere
// which draws static elements
}
renderAnim(); // function defined elsewhere
// which draws animated elements
} catch (e) {
if (window.console && window.console.log)
window.console.log(e); // for debugging
}
requestAnimationFrame(Draw);
animateRunning = false;
}
}
[/code]

To start the drawing we can use StartAnimating() and to stop we can use StopAnimating()

Following this pattern should help you improve the performance of your HTML5 canvas app – while also reducing the load on your user’s computer. A double benefit!

How To: Installing WordPress for IIS7

So you fancy doing some blogging? How do you install WordPress for II7 and above? This should show you how to install WordPress in Internet Information Services 7.

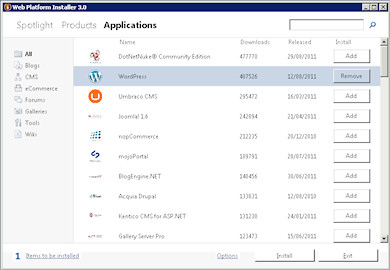
First, fire up the Web Platform Installer as this is the easiest way to start. Choose the Applications tab and click “Add” next to WordPress:

Choosing WordPress in the Web Platform Installer
Choose WordPress in the Web Platform Installer

The click “Install”. If you are asked whether to install any extra needed components (e.g. PHP, MySQL etc.) – confirm this.

Choose to install MySQL locally

At the next screen choose to install MySQL locally; unless you are going to run it across multiple servers or have an install of MySQL you can use elsewhere.

Confirm install, with required components (e.g. PHP)

Confirm the install at the next screen. The little crosses threw me a bit, ticks might have been better…

Choose admin password for MySQL

At the next screen you need to create an Admin password for MySQL. Remember what you enter as this password as you will need it later – click continue.

Wait for install to complete

The install of all the various components, and any service packs etc. can take a little while so be patient…

You may have to restart a couple times

You may be asked to restart a couple times, depending on what bits needed to be installed. After a reboot, if the installation doesn’t continue straight away – just fire up the Web Platform Installer again and it will continue.

You may receive installation errors

If you receive any installation errors; check the logs, however this is likely to be from restarting at inappropriate times. Just reselect WordPress to install – your list of extra extensions should be shorter – and hopefully the install will now complete without errors.

Choose IIS website setup details (click for larger)

At the next screen you choose how your new WordPress site will be accessed from the internet (click to see larger version):

  • Website: Either Choose a “New Website” if you want it to go from the root of a domain or subdomain; or choose an existing site if you want it off a subdriectory.
  • ‘WordPress’ application name: Use / if you are creating a new website and want it in the root, else choose the subdirectory you want it accessed from the Internet at.
  • Web Site Name: This is the both the Application pool and the name of the Site in IIS Manager, unless you are creating a subdirectory – when it is just the name of the App Pool.
  • Physical path: This is the actual physical directory on disk where your WordPress files will be held.
  • IP Address: Unless you want WordPress to only respond on a particular IP address – just leave this as “All Unassigned”
  • Host Name: This is the actual domain that WordPress will respond to, so set it to the subdomain or domain you want to use e.g. blog.yoursite.com or www.myblog.com etc.

After filling in the details you want to use, click continue.

Enter the database login credentials you provided earlier (click for larger)

At the next screen you need to use the database password you entered earlier for the Database Administrator Password. Scrolling further down:

Enter details for a new user WordPress will use (click for larger)

Choose a database User Name and password for the install to create. Note: this is not the user name you will be using, but the user WordPress will use to connect to the database. If you installed the database locally, put localhost in for the Database Server.

Scrolling further down:

Add some strengthening phrases (click for larger)

Enter a database name to use, this could be the name of the blog or the website name you used earlier. Next you need to enter a set of Unique Key phrases. These are to strengthen the encryption for passwords and authentication. Go wild, you don’t need to remember these.

Click continue:

Installation complete, click launch WordPress

You’ve now installed WordPress and just need to do a final configuration step, so click the “Launch WordPress” link on this page.

Configure WordPress and setup new user (click for larger)

Now you just need to fill in a few more details on you new WordPress website.

  • Site Title: This is the title of you blog “My blog” or whatever you want it to be known as.
  • Username: This is the Username you will use to actually login to your WordPress site.
  • Password: Choose a password
  • Your E-mail: And enter your email address

Click install WordPress…

Congratulations! You should now how WordPress successfully installed and ready to use. Just log in at the next screen providing the login credentials you just supplied:

JavaScript: Don’t spam your server, Debounce and Throttle

If you make server call-backs or update the browser GUI based on user interaction you can end up doing far more updates than necessary…

In fact on one occasion, during Illyriad-beta testing, we started tripping our server’s dynamic IP request rate throttling and banning our own IP address – D’oh!

Common situations where over responding to events are mousemove, keypress, resize and scroll; but there are a whole host of situations where this applies.

We update our pages dynamically via ajax, based on user clicks around the user interface. In this situation if the user makes several page navigation requests in quick succession – the only important one to be made is the last, as for all the previous ones the data will be thrown away. So why make the requests in the first place? It’s just unnecessary server load.

Equally, if a user is moving an mouse around a map and you are updating UI coordinates for every pixel change the mouse makes, it potentially a huge number of DOM updates far beyond the perception of a user; for no real benefit, but it will cause a degradation in performance.

Initially, we controlled the situation using complex setups of setTimeout clearTimeout and setInterval. However, as the various places we made use of this became more varied, with different sets of needs, the code became more and more complex and difficult to maintain.

Luckily, it was around this time we discovered Ben Alman’s jQuery plugins debounce and throttle; which are extremely powerful – yet simple to use of and cover a whole host of permutations.

Throttling

Using his  jQuery $.throttle, you can pass a delay and function to $.throttle to get a new function, that when called repetitively, executes the original function no more than once every delay milliseconds.

Throttling can be especially useful for rate limiting execution of handlers on events like resize and scroll. Check out the example for jQuery throttling.

Debouncing

Using his jQuery $.debounce, you can pass a delay and function to $.debounce to get a new function, that when called repetitively, executes the original function just once per “bunch” of calls, effectively coalescing multiple sequential calls into a single execution at either the beginning or end.

Debouncing can be especially useful for rate limiting execution of handlers on events that will trigger AJAX requests. Check out the example for jQuery debouncing.

In fact its well worth checking out all Ben Alman’s jQuery Projects as they are full of little wonders, that you soon are sure how you did without them!

Revising the Character Art

When we came to revise the character art for Illyriad, it seemed clear that the first batch of characters should be warrior-kings and warrior-queens.

This calls to mind King Arthur (who in his prime, most people imagine as thirty-something), Genghis Khan (whose power was at its peak when he was in his fifties) and Alexander the Great (at his greatest in his late twenties). History and fantasy fiction are both full of warrior-kings who are thirty-something-ish, physically fit, with huge charisma.
But warrior-queens? Ah, now that was a problem. History is not full of strong, female warrior-rulers, and most that do crop up are contentious or little-known. Meanwhile, fantasy fiction tends to present a rather different view of female characters.

I saw the new Conan movie last night. It was full of capable male characters, aged anywhere from 15 to 50, many of them ugly, and all allowed to develop their own way of being cool. The key female characters, meanwhile, were indeterminately young, and implausibly good looking. This kind of predictable view of females in fantasy (maid, mother or crone – mostly maid, and generally only she is allowed to be kick-ass) was a challenge for us.

My first instinct was to say “b******s to that – we’ll have our females in Illyriad as real ass-kicking females would be – unsympathetic, beefy, no prettier nor uglier than the average – lets make them real”. But of course, we’re doing this for our players, not for ourselves, and a lot of people like the athletic warrior-maid ideal.

We considered both extremes. We considered a compromise. But then we settled on the solution of exploring both ends of the spectrum.

We wanted one character who was the sort of woman who would really want to go to war and crack skulls. As we evolved the mood board, we realised that a lot of the images we liked were Baba Yaga – so, our female Orc was born.

And of course we had to have one athletic-warrior-supermodel type, and she swiftly became the Elf.

The character I personally liked the most, was the Human. She’s probably over 40 (though, hey, this is fantasy, so she’s well-preserved for her 40s, and uses cosmetics), she’s good looking without it being obvious, and she has made sure that she’s well armored (close up you can even see that the red under-armor is heavy-duty brigandine, not some sort of soft quilt). And she has the gravitas, the authority, that you’d expect from someone who rules her own fiefdom. She’s a female ruler whom I can immediately believe in.

I was pretty happy with the results. Until I put the image together for this blog piece. Look at the picture. Face, palm. Doh!

Maid, mother and crone.

They are pretty cool. But it’s still the three stereotypes.

For the next batch of art, we’re going to have to find ways to be cool without reverting to any of these three types.

Extreme Perspective: Artistic Evolution

It is time to give everyone a glimpse into some of the creative process that goes into creating the graphics behind Illyriad.  Here is a step-by-step timeline of how I piece together an illustration.

Step 1: Brainstorming and Rough Sketch

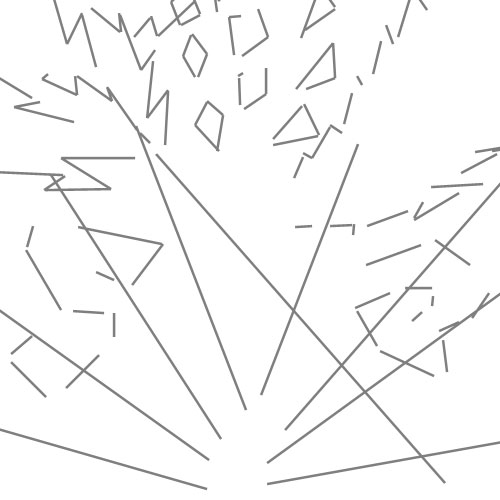
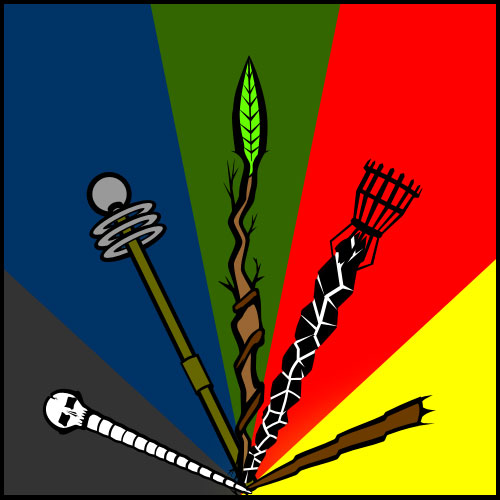
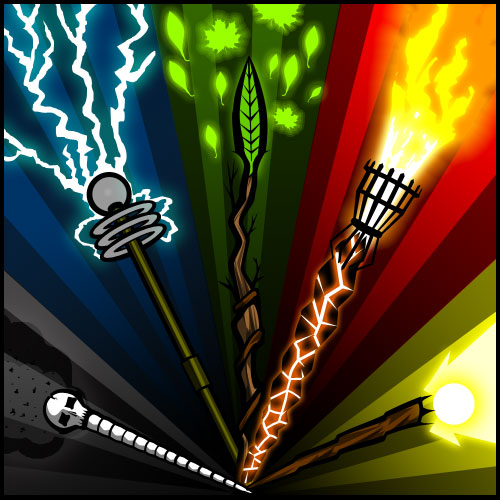
We will be implementing illustrations to the entire technology tree in Illyriad in the very near future, however as I have only been working on this project a couple of short months I have only had enough time to complete one of the trees.  To allow us to implement them now we have decided on adding in placeholders to sort of “fill in” for the real graphics while they are being produced.  The following is the creative process for a placeholder that will filling in temporarily for Magic tree graphics while they are under production.  I wanted to create something that would be all-encompassing for both present and future graphics.   When I think of magic I envision a mage or wizard spewing magic from an outstretched hand in a fan of light and energy.  I wanted to avoid something as race specific as a human or orc hand so I decided on a series of five staves fanning out from left to right from cool to warm colors.  Not only would it give a visually attractive effect it would span a variety of different schools of magic.  With this in mind I moved on to my rough sketch.

Yes, this mess of lines is going to turn into something and it really does help me bring out what I have in my head to something I can see and tweak to my liking.  This is probably the most important step in the process…it gives me a sort of skeleton for my piece, allowing me to build from the ground up around it.  I usually do this step the line tool in Photoshop. Unlike a lot of artists, I like to do even my rough sketches on the computer.  Rest assured that this ablated mess will turn into an illustration.

Step 2: Contour

Following my rough sketch I get into the real meat and potatoes of the illustrative process: drawing contours.  This stage really allows me to flesh out my sketch and give it some definition.  During this step I can see if my idea is really going to work or not, and I can make adjustments and see whether or not I need to scrap the idea and move to something else.

I like to keep in my rough sketch so I can still visualize the overall illustration and see what I am trying to accomplish.  Throughout the entirety of the illustrative process from here forward I use the pen tool; this phenomenal tool allows me to tweak lines and shapes through anchor points and keeps out sloppy nasty pixels.

Step 3: Flat Color

After finalizing my contour lines I move on to my Flat Color step.  Here I get rid of my base sketch by hiding the layer (I never delete it as it my be useful later) and then start adding in color through using pen tool vectors of varying colors.  Vectors are very important here as well as I can shape and modify them if I don’t get the colors exactly how I like them.  A very critical point here to is to having colors beneath the contour lines.

As seen here, this step can be very discouraging…it’s still not very pretty.  The colors seem not to mesh well together and everything looks very flat and bland.  Don’t worry though, once shading, glow, and gradient effects are added in it really brings the piece to life.

Step 4: Effects

Magic is the perfect illustration to demonstrate the Effect step of my creative process as some of my work completely foregoes this stage.  This particular piece had a lot of energy in a very literal sense: lightning and fire mainly.

One of the most effective tools I have found for portraying very intense sources of energy is a simple white line with a colored glow around it.  This simple and effective technique gives a sense of intense energy radiating from a source.  With this step finalized I move on to the final stage of the process.

Step 6: Shading and Finalizing

By far my favorite step of the creative process is the final step of shading.  I go over the entire illustration bit by bit adding in varying degrees of shading with the pen tool, this step is what brings my pieces to life and gives them the energy I am looking for.

In this stage I add gradients, light and heavy transparencies, and all sorts of various effects to complete the illustration.  This gives the final piece depth, energy, and emotion.